Monday, August 29, 2011

Another week's work & more progress.

Another week of heat, humidity and quite a lot of rain has just passed - but finally the sweatyness of our work seems to be relenting to cooler and more comfortable levels. It's made me decide we will have to instal 3 air conditioners. Not as green as I'd hoped, but I figure there's no point in sweltering and being uncomfortable for the few months of heat each year after doing all this work. The house needs to be comfortable in all seasons.

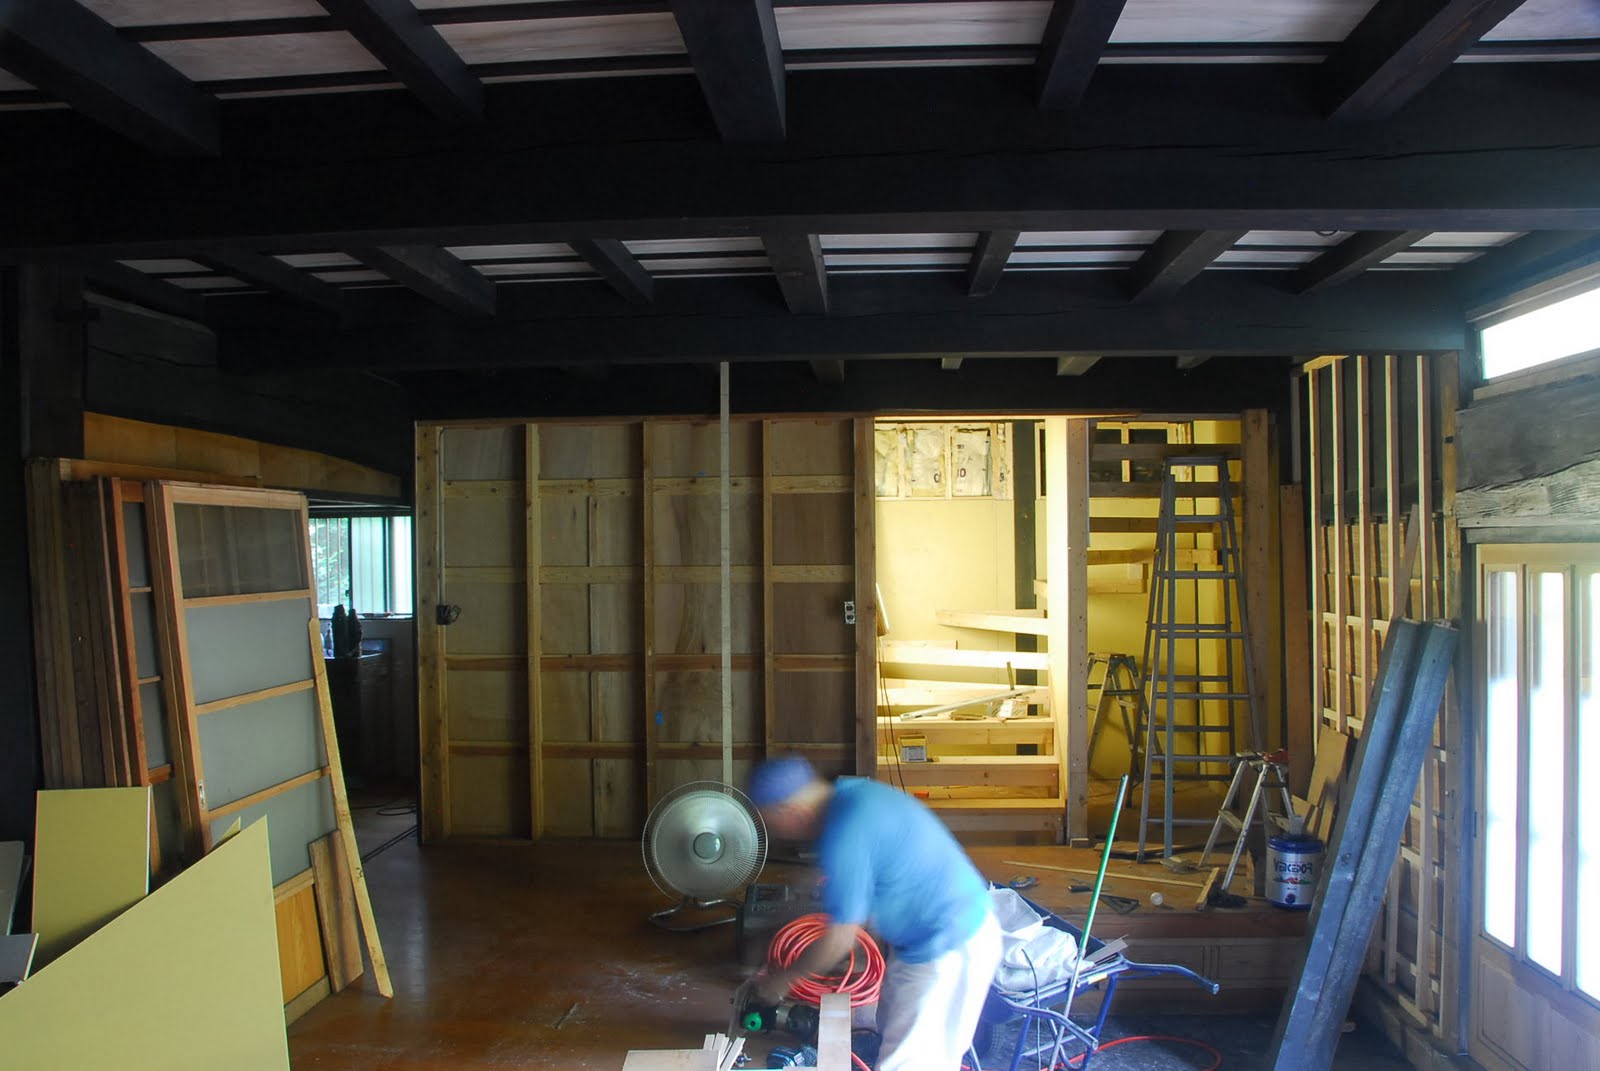
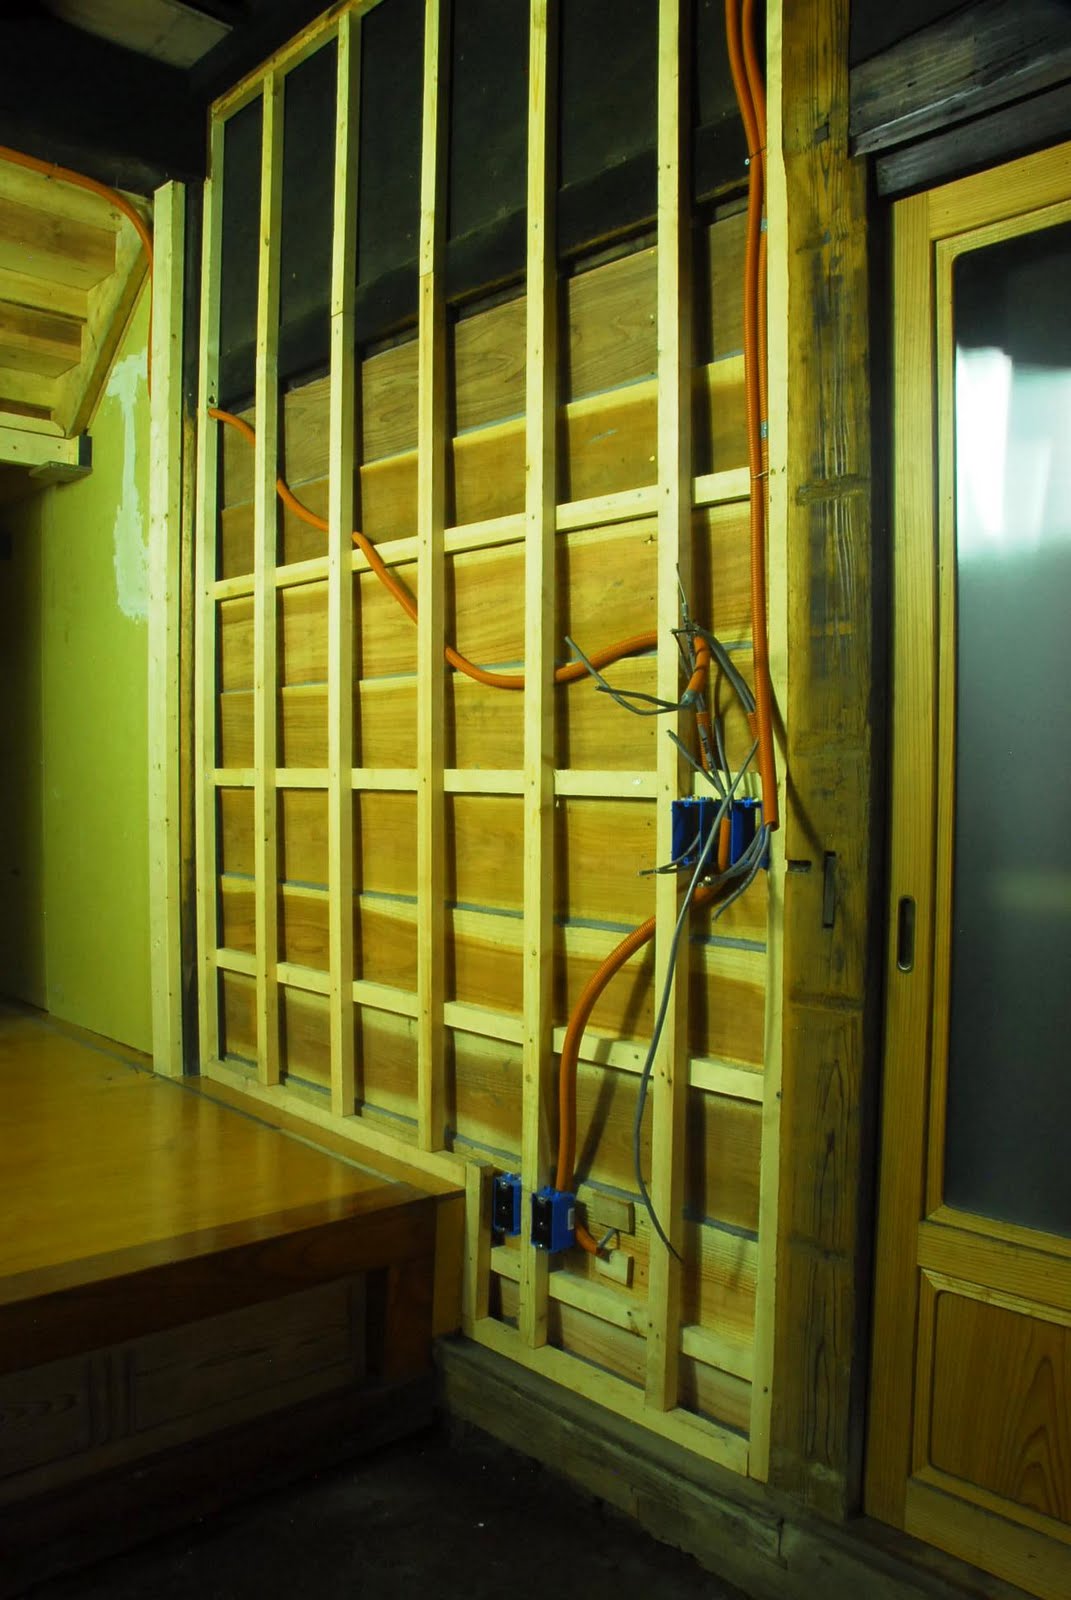
Arnie spent some of the last week working out the wiring for the entrance hall (Genkan), as well as finishing the wiring for the 1st lounge. I routed through cables for internet, phone, digital TV & speakers (12 gauge) to the lounge too. Hopefully my planning will work out so we don't have wires trailing on the floor, but have all connections neatly concealed around the house.


Arnie took the stairs apart again, so he could re-finish the wood with a 2-tone colour scheme echoing the ceiling's beams and Sugi ceilings. Starting with oiling, this helped the stain not to become too concentrated in some areas. After drying he coated with a well thinned Semi-gloss (Satin) Eurethane varnish. About 3 layers will complete before the stairs can be re-assembled.


Whilst Arnie was working on the stairs, Shinobu wheel-barrowed rubble to the gulley adjascent to the drive before the Kabuki gate, which we're landfilling as we go.
He then stained the wood frame, ready for wallpapering the stairwell and under-stair storage area this week.

It took all three of us to manouvere and push the original god box out of the house. It weighs about 400+ kg! Will see if we can sell it to recoup some costs. Might be an antique, but it takes up far too much space & light inside the house. Thankfully I was able persuade my wife to let it go. God doesn't live in a box, but all around us!

Shinobu had also lifted out all the plywood ceilings and wallpapered those, so Thursday afternoon he & I relaid the floors, leaving the trap door still opened, since it would have to be lifted up to allow them to work upstairs soon anyway.


Yuko had bought these pretty lights from Turkey during a visit to explore belly dancing further some 5 years ago. We'd been hoarding these away. Now finally, having bought the correct fittings in Akihabara last week, I was able to make them work.
They'll give a better ambience with a dimmer I think.


Arnie & Shinobu plasterboarded the lounge wall on Friday (Pictures don't show it, but inside these walls is insulation too).
I spent that night putting the finishing touches to the beams in the roof (Staining the lighter wood, filling small holes in the wall and painting minor imperfections I'd created from carelessness with the black stain falling on white walls, staining the old shutter doors, followed by Eco-Walling the finished wall and cleaning up the floor.


Although there are no pictures (I wanted to wait for the scaffolding to come out and the beautiful wooden lattices to be refitted & so have more to show...) the 1st lounge is finally ready for me to work on laying the oak floors. I'll do it this week and if I make good time - stain and put on the first coat of varnish too.
Hopefully I'll have pictures to upload at the end of this week of another (nearly!) finished room...

Saturday morning I also worked out why the Lutron dimmers we ordered from the States aren't working so well. Something that's baffled us a bit. Turns out they're the wrong ones for the jobs at hand. I resigned myself to ordering some more, which should be on their way soon. Still - the stuff from the States is of nicer design and (hopefully!) function than what's available in Japan...

Finished the week by heading to Akihabara again to buy the connectors for the co-axial cables. Much cheaper than buying from the local electrical superstores and always fun to check out all the little electrical widgets for sale in the market there... pays to shop around though, the same bits can cost double in some places, especially closer to the main road!

Sunday, August 21, 2011

Other Work in Progress: Second Lounge & Children's Bedroom


The second lounge will be a continuation very similar to the first lounge. Same high Sugi stained ceilings, lots of white walls with surrounding posts and beams (Useful for large pictures / paintings), sliding doors to adjourning rooms, oak hardwood floors and new aluminium framed windows (Next year).
Where there's a wall separating the children's bedroom we intend to fit a large wood burning stove imported from the States in the future. That's where they make the best ones. Of course we'll have to be very careful with flue design as we have thatched roofing that's dried for a couple of centuries. Lots of insulation and rain proofing & straight as possible flues, although by the time it goes through the roof it'll have cooled a fair bit, being roughly 25m high.

Wood will come from our own garden which should keep me fit cutting down & carrying lumber around to dry, then use for fires. The stove will provide centralised warmth There will be similar lighting as used for the other lounge. Mostly we plan to use table lights (Attached to a dimmer and centrally controlled) but can use others when there's a need for a mood change.

We plan to hold social events in future, so the two lounges will become one when the need arises for larger groups. Speaker wires will all be in the walls, so we don't have to have cables trailing around on the floor and the audio amplifier and other things will be located around the corner leading into the dining room, so sound can be centrally controllable.

This week I spent some time removing the ceiling beams from the children's bedroom and seperating the ones that are good from those that need to be replaced because of woodworm. Thankfully except for the beam between the lounges, there's no other structurally eaten wood. The buggers only ate through floor and ceiling boards and a few of the ceiling beams closest to the back walls.

As with everywhere else, there was a LOT of black soot, straw, soil and 200 years + of dust. Disgusting stuff! The poor Dyson got clogged several times, then beaten clean, filters washed and put back into service, but it's still going strong.

On Friday having removed numbered and cleaned the ceiling beams (They're all different sizes so numbering is crucial!), we re-fitted a few temporarily to make a floor to work from to clean & wash (With a damp cloth) the thick tree trunk beams above, get rid of all the dust, then used plastic sheeting, remaining wood from the shims Arnie had + lots of 13mm staples to attach to the upper beams. This way we can exclude most roof dust and the space above the children's room can be used for ample storage.
Next week we'll finish plastic sheeting the other half and I'll dark stain and sellac the wood, ready to go back in.


Arnie can begin completing that room once he's done the remaining electrical, staining and varnishing work on the stairs, or maybe I can do that so he can move on.


There's clearly lots to do here, but it should be faster than the master bedroom since there's only wallpapered Plywood ceilings to fit, rather than the more intricate Sugi ceilings and not many walls (Lots of sliding shoji doors).
We still need to figure out a few aspects of the design, but I reckon 2-3 weeks and it can be all done. Next will be the dining room, followed by the first lounge. The kitchen & pantry will be left till last.

The guest room upstairs can be finished after we've already moved in, but ideally before if possible. And I have to fix up the old bathroom too, but that's only temporary as we have big plans for that to do when funds allow, based on all glass walls and ceilings facing the edge of the forest with two bathtubs. One for hot, one for cold water, since it's so good for blood circulation.

For now we'll use the kitchen much as it is, so we have time to really consider the layout we want and tailor it to make a space where 1 or more people can cook together and friends can sip a drink, snack & relax when they visit. It could take about 3+ years to really complete the interior to the standards we want, but that's part of the enjoyment of seeing a project develop I think. It's a lot like building cars, only much larger.

Guess I'd better stop for now, before I get too over excited thinking about it all. These are dreams thankfully coming true after years of thinking, praying and working hard towards saving up to have our own place someday.

Time's ticking along quickly as ever and we still have a lot to get done before we can move in - end of October so we'll see.

All the time the baby inside my wife's belly's getting larger. Life has a habit of throwing challenges in everybody's path, but thankfully we're enjoying these despite the hard work. I'd also like to thank Arnie for his tireless dedication to the work at hand. In many ways this house is becoming a tribute to your amazing skills.

Pantry, Spiral Staircase, Coat Wardrobe & Wiring


Some time ago, Arnie made most of the new pantry. Wall & ceiling surfaces currently remained unfinished since all the house's electrical wiring, plus internet, digital TV signal, etc. will come from here. This will be one of the last rooms to be finished, but it's a lot better than it started (So eaten by woodworm it was super light when dismantled!

When it's completed, the pantry will have large shelves with under lighting and plenty of wall insulation & florescent overhead lights recessed between the thicker beams. This is the best kind of light to see colours of food with - an important consideration, which is why there won't be pretty spotlights or such here.


Note how the entrance hall (& pantry) ceilings will be finished. No wallpaper is stuck to the plywood yet, but instead of bare wood it'll be textured white wallpaper contrasting against the black parts.
This will be exactly the same finish for the children's bedroom and dining room.


I'd never realised just how much engineering goes into making a spiral staircase.
Arnie's a faithful man of God - and at night receives dreams of the solutions to the challenges ahead. Although an experienced carpenter, this was the first time he was making a spiral design coupled with a house which isn't exactly symmetrical.

At first he realised the design measurements he'd worked out were flawed as he marked the plasterboard, but soon realised he hadn't accounted for the thickness of each step. Each cornering step is made of 2-3 pieces of thick pine, splined and glued together flat during each night he returned home from working here.


There's all sorts of angles and they have to meet very closely with each joining piece. With other tasks in between Arnie's taken about 2 weeks to get this far, but we're very pleased with the result. Next the steps will be stained a dark shade, with the vertical boards and skirting to be stained red, similar to the ceiling boards, then varnished. Walls above and below the stairs will receive textured washable wallpaper, because children typically run their hands down walls when going up & down aand like to create little hiding places with friends under stairs...

Under the stairs there will be space for heaters, fans, dog (car) cage, vacuum cleaner and lots of hooks for coats & of course there will be a framed (rectangular) door for the wardrobe and also a similar door at the top of the stairs for the guest room.

I'd originally thought of a framed arched entrance to the stairs and a similar sized door to the wardrobe and at the top of the stairs, but several friends pointed out there are no other such angles anywhere else in this house, so it would seem a bit out of place. So we're using large wooden beams as the effect. Either side of the bottom of the stairwell there will be thick beam facades, with plaster-boarded walls of course.


A total of 6 12V lights will sit low on the walls over alternate steps about 23cm off the step surface, to provide an ambient & inviting light. On the cross about half way up the stairs there will be a beautiful stained glass up-light.


On Friday Arnie spent most of the day working out where to put wiring for the remotely switched wall sockets, stair wardrobe and entrance hall lighting as well lights above the door. Note the new wooden walls are sealed with silicone between the cracks. We're keen to exclude insects as much as possible.

Saturday morning on my way back to Shizuoka, I went via Akihabara to buy some bulb holders for a pretty Turkish origin but very oriental light to fit in the entrance hall. Once the ceilings are wall-papered it'll look very pretty. Not too far to go here. It may be the next room I decorate, if not the children's bedroom which is the next one scheduled for Arnie & Shinobu's attention.

Saturday, August 20, 2011

Firstt Lounge - Eco-Wall & Upper Lighting


Just before the beginning of Golden week Arnie moved onto his next job - creating a spiral staircase with storage below, so I was left to eco-wall and fit the spotlights. Final decoration is the most fun for me, as I get to see how the room's turning out as it completes.

Funny enough, the plaster I used is the same colour as the bedroom, but it doesn't look yellow in these pictures.

I started off by cleaning all the overhead beams a 3rd time to make sure then was no black dust remnants from the fitting of the ceiling, then masked off all the wood surrounding the new walls.


Eco-wall is fairly easy to work with. As the walls are so high, they're less likely to come under scrutiny but by this stage I find I'm getting better at doing a good job of it. The hardest parts were around the wooden rectangles & the tiny sports where two beams converged and I couldn't get the trowel in there. For those corners I used a small end of a plastic spatula.


There are a few small holes where the beams come through the walls, so I'll mask again & fill those with black Silicone sealant next week.

To keep dust from entering the bedroom whilst I was varnishing Arnie made up some plastic sheet windows but between the bedroom and first lounge there are some intricate wooden lattice frames to be re-fitted which will allow for air-flow. These will be fitted later.

I fitted 8 spotlights so far. 4 pointing to the ceiling (Soft mood) and 4 pointing down (Much brighter). These will be controlled by pre-set dimmers and in addition there will be 2 more switches controlling corner (table) lights and a couple of picture frame overhead lights.


There are still some facades to go up around the lowest beams where slats used to sit for the original ceiling and of course wiring and wall sockets as well as one floor socket in the middle (A good way to provide power for a small coffee table or centrally positioned floor light next to a sofa. Next week the electrics will be completed, so we'll be able to dismantle the scaffolding and begin fitting the oak flooring.

The ceilings are very high of course, which gives this room a grander feel but makes it difficult to photograph without use of a very wide angle lenz.

Before Spring we hope to replace the wooden doors direct to the garden with full width aluminium framed sliding glass doors with insect nets for summer (& the same modification for all the garden facing doors).


First Lounge - Plaster-boarding Walls, Sugi Ceiling & Worm Eaten Structural Beam.

Having finished the bedroom ceiling off, Arnie & Shinobu moved onto plaster-boarding all the upper walls. This included having to cut to fit over the protruding roof beams (These weren't previously visible, as the ceiling used to be only as high as the first beam, at the same level as the bedroom) and cutting sheet to it would follow contours of beams. This took a good few days to do, where the much easier bedroom had only taken them an afternoon to board the walls.


With summer and the humidity now in full swing, being up there was hot & sweaty work.


In between, I spent one evening GL puttying the larger gaps and screw holes ready to apply eco-wall.

The ceiling planks had been pre-prepared from bare unfinished Sugi (Japanese Cedar) which cost a little over 1,200 Yen per 8 plank bundle. Being rough, they'd had to be prepared. This included drying by stacking with enough space in between for air flow (& using a large fan to blow air through them during some nights!), passing each displayed face one by one several times through the planing machine, followed by cutting a 45 degree chamfer on each length, routing each plank for splines to be fitted, cutting splines, then treating the wood in the same way as the bedroom.

Here we see Arnie & Shinobu fitting the first planks.
Note the dark brown slats are from the original ceiling which had been much lower before.


Whilst fitting and nail-gunning into position, Arnie & Shinobu had to be careful to put the nails in the right place so they'd go straight into the slats and not next to them and also ensure they didn't apply pressure to the slats but keep them running straight.


The Sugi plank's preparation had included oiling, staining and sellacing before carefully nailing each plank into place. They also made a small box around each vertical wooden post, to nail the edges of Sugi ceiling into.

Such factors of attention to detail should pay off to stop dust falling through the boards - helping keep the house clean in future. To finish off the ceilings Arnie covered them from above with synthetic in-bag insulation.

By this stage Shinobu had left to go and spend a couple of weeks in Tateyama with family friends. Arnie's & my next job was structural. The tall thick beam separating the first & second lounge showed signs of having been eaten through by woodworm.
Arnie made a guide and routed off a rectangular piece bit enough to see inside. It became clear a long time ago worms had eaten through this (Pine) but left the outside mostly intact. It was disgusting how much worm poo came out, but we chipped at it till all that was left was solid, then vacuumed it out with the trusty Dyson.
We finished by putting in some 2 x 4 beams inside (A friend I told this to likened it to putting matchsticks in as support!) and wedged in smaller pieces of wood.
We then filled the small holes on the opposite face, glued on a wooden board where the routing had been done, nail-gunned it in, then once everything was suitably hardened I filled the remaining space inside with expanding foam.

It was clear the beam (as well as the rest of the house's structure) was about 10 times over engineered originally and the woodworm hadn't caused any danger - but it feels better to know what's what and have no untreated decay in the house.

We want to do this job once then enjoy living in it and avoid having to do them again from having band-aided things the first time around. I had been reliably told to expect Arnie's work to be permanent and well executed. Now the house is taking shape I'm glad to see he's as much a perfectionist as I am.

Master Bedroom - Floors.

For those of you who have followed the build from the beginning, you'll know about our trek to buy & deliver the oak flooring to the house. All the floors except the entrance hall and kitchen will have this covering, although we're still deciding if the two lounges will have the same "Golden Oak" stain, or a darker shade. I prefer the master bedroom's finish, but my wife's vision is of a darker colour for the rooms where we'll have guests and hold events... She's the boss there!


This was my first time laying flooring, so after some guidance and advice on how to complete the job from Arnie, I got on with the job. This was from the end of July, so there was lots of humidity & heat. We figured the wood had expanded as much as it was likely to, but I still used thin plastic spacers to ensure there was space for movement if needed. I learnt how to use a chop saw fairly accurately and to apply glue to secure the flooring to the plywood, secured with the use of a nail gun as I went along. The glue's stronger than the wood and in doing this, the floors will be squeak free, but the downside is, it's now so permanent I'd have to rip out the plywood and flooring together if we ever decided to change. Fortunately we're happy with the results. Just as well...

Typical of Arnie's attention to detail, once the flooring had been fitted it was flush with the edges of door channels, etc - something he engineered using shims under the flooring frame beneath the (splined) plywood. He had advised me to measure distances from the wall I would be building towards as I progressed and space the oak accordingly with an extra spacer here and there, so the last board would fit easily and not look skew. It was a relief to find I'd succeeded as I came to the last board.

With Arnie's experience & advice in hand I first used an electrical sander with 180 grit paper to remove any imperfections, then vacuumed well using a Dyson cleaner (As new condition - bought from Yahoo! auctions for 15,000 Yen. Perfect for heavy duty house cleaning & for use in future on cars!).
I then applied boiled oil so the "Golden Oak" stain wouldn't blotch, but be more consistent.


Next I applied a 50/50 coating of Golden Oak stain & thinner, so it would soak well into the wood. Took about a week to lose it's tackiness as the oil can still dry even when the varnish has hardened.


I could tell it was dry when the smell of varnish was pretty much gone.
Yesterday morning just before I left to return to Shizuoka for the weekend, I used the electric sander to go over the varnish again, vacuumed and finished by wiping the surface clean with a damp microfibre cloth. I then made a 25% thinner / 75% varnish solution and applied with a synthetic fibre-mat brush, packed up and left it to dry for the weekend.


Headed home via Akihabara to buy some replacement light bulb holders (Japanese size) to adapt the beautiful pendant light my wife had brought back from Turkey during her trip there in 2006. Way back then we'd begun to dream about creating our own home.
Piece by piece it's taking shape at last.

Master Bedroom - Walls & Ceilings.

Our bedroom is the first to have become inhabitable. The first pictures here were taken during the last 2 weeks of July.

To start with, Arnie built a strong wardrobe section above the old Wardrobe, where there had previously been an earth wall. Boxes of things can be stored up there and now there's a strong frame on which a thick metal clothes rail has been fitted.
The upper doors will be sliding type of the same finish as the ceiling. Unfortunately the design on the main sliding doors of the wardrobe was half damaged from soot collecting on it, but it was old and in need of replacement anyway. To be completed later...

The plasterboard framing for the walls was carefully measured by Arnie so the edges of board would be screwable directly in place with minimised trimming and waste. Shinobu then filled all the cracks and screw tops with GL putty, leaving the surfaces ready for me to mask, then plaster using Eco-Wall (A cream coloured ready mixed plaster made of crushed abalone shells - very durable!)


Arnie & Shinobu then set about fitting new bedroom ceilings. Originally they'd been Japanese Cedar, but some of the wood was damaged and there were spaces between them meaning dust could get through from the thatched roof, a problem with these very old Japanese houses, not least because there was a thick mix of hay & soot (from the indoor fires) sitting on top of all that wood! No wonder the people we've spoken to who knew this house said it got easily dusty on windy days!

Arnie's solution here was to use a router to cut channels into the side of each new Cedar plank so a spline (Also stained) could be fitted in between. Ends of each plank was cut so they would fit above one of the dark brown support slats, so the wood appears endless.

Each plank was first oiled, so the stain wouldn't blotch, then once coloured treated with Sellac.
A nail gun was used to secure wood onto the slats & edges and finally some thick insulation was placed on top. The finished result more beautiful than it appears in the pictures and we're looking forward to lying in bed and gazing at the ceiling.


8 x 7W LED dimmable spotlights were fitted, two either side of the alcove (Where a small wood burning stove will be positioned in future). By where each bedside table lamp will be fitted is an electrical socket - controlled by the second dimmer on the wall at the entrance.


Note the walls are an off white cream colour, not yellow! - Unfortunately the camera over emphasised the yellowness when pictures were taken - probably due to incorrect white balance.


Since the end of July when the ceilings and eco-wall plastering had been completed, I've taken up residence in the bedroom and spending 2-4 days / late evenings a week decorating.

I learnt how to plaster with eco-wall. Took a bit of trial and error (The alcove walls were a bit too uneven so I re-finished with a sander, which made a helluva mess and took me one evening just to clean every surface including the ceiling!) but I learnt to use a flexible stainless steel trowel (The plastic one they sold at home-centres for the job cracked!) and to do a thin first coat followed soon after by a thicker second coating as the first one dries. The finish is very good. Not perfectly flat, but it fits with the build & age of the house as well as the few remaining wattle & daub interior walls. My guess was right I think. By the time I finish all the plastering inside I'll be well qualified to repair the cracks on the outside walls perfectly.

In all, I used about 35 litres of cream coloured eco-wall for the bedroom and about 1 litre of paint to cover the two original walls above the shoji doors.

My first week's tasks also included being in the bathroom (There's no hot water yet, only a cold well-water fed hose which I use as a shower - no hardship as it's summer and I prefer having cold showers to refresh me this time of the year anyways!) for about 3 hours dissolving the glue from the shoji paper and washing off all the soot that had collected on them. After the 1st lounge and perimeter corridor are both finished I'll put on new paper & tune the doors to run effortlessly & smoothly.

All new electrics have been fitted and the wall plates are dark brass.
On these pictures there are still no skirting boards or oak flooring.
That was when the room really begun to take shape.


More plywood Floors.

Once they'd finished doing the exterior, Arnie & Shinobu replaced the few worm eaten planks, laid plastic sheeting then shimmed and laid underflooring for the dining room and children's bedroom.

Whilst they were doing the dining room we noticed the underside / entrance to kitchen had been rebuilt / restored - probably about 20 years ago. Still strong, so it'll make a goo base for tiling when we re-engineer the kitchen in the next year or two.

Under the floor planks are thick half sections of trees which are still perfectly solid a couple of centuries after being laid.


Looking from the childen's bedroom across to the master bedroom and 1st lounge to the left.
A lot has changed since this picture was taken. See the master bedroom post.


The picture below shows the flooring that is (now) fully laid above the main entrance, for the 23 tatami guest room upstairs. The ply is cut so the joints sit directly above wooden beams, so there's no visible joints. The idea is for the plywood to be covered with textured cream coloured wallpaper and screwed into place. This will hold the paper in place well for years and should it ever need to be replaced, the boards can be individually removable after taking out securing screws. In the centre of the floor is an easily removable section, with a large beam overhead, to which a pulley system can be attached. Useful for lifting heavy furniture through without needing to negotiate the staircase and doorway (See subsequent post).

Stripping old varnish in the Genkan.

The job of stripping the old varnish off the two large wooden lower beams took me an afternoon whilst Shinobu & Arnie were working on the exterior walls.

Some of the wood's darkened in places. I've left it as is for now and will sand it down, perhaps lightly stain and varnish. It was a pleasure to see it come to life. There's some beautiful wood waiting to be treated with the respect it deserves in this house.

Need to wait for a dust free opportunity to complete the varnishing, but I prefer to wait till the rest of the entrance area is done (Stairs, etc) - coming soon!


Left side shows old varnish being stripped. Right side's bare untreated wood.


Stripped!

Before:


After:


The wood floors here will probably remain for at least the first year. We have plans to fit 1 inch bamboo cut in halves, varnished and stained, then bonded to the floor.

Would look much like what my wife & I saw in the entrance to a guest house we stayed at a few years ago.

The bamboo could come from our garden. Inexpensive to do, but time consuming - so we'll probably leave the bamboo plans till after we move in and prioritise the jobs that do need doing (lots!)leaving the current oak flooring in place for now.


Exterior Wood Wall Replacement.

It's a rainy cool summer's Sunday and finally I find myself with some time to sit down and spend a few hours uploading pictures & update you all on the progress that's been made the last 2 1/2 months.

Lots has changed! First off my wife's pregnant with our 2nd child who is due end of January 2012. Learning of this, the urgency to complete the house before summer completely vanished. We feel blessed to have a sibling on the way for our daughter so the two of them can play & together enjoy the outdoors that will soon surround their home.


In hindsight I can see now there's no way we'd get all that's planned done by then anyway, so the new target is end of October, when the weather will be cool & comfortable to make the move from Shizuoka.

This is a much bigger project than I'd originally envisaged, not least because we keep finding things we want to have repaired or replaced now rather than leaving till later and being a perfectionist Arnie needs time to consider the best solutions, discuss, fine tune then put thoughts into motion & change.

As we looked closer at each aspect we'd find we had to replace large surface sections than leaving them as they were, or do considerable repairs.


Some of the wooden exterior wall had become very thin & cracked from weathering over many decades & had holes where knots had fallen out, etc, so they were replaced. This wasn't just a matter of cutting to size and replacing planks, but included routing channels in the wood to fit splines in between (& allow for expansions & contractions from heat & humidity) & coating with odourless creosote for protection & making the wood look original. The fit that resulted was so perfect no insects will get through.


Arnie routes a channel for the spline to fit inside a wall plank.


Shinobu screws new wood into place.


A sign of a good job. All new & creosoted wood (right only) looks as old as the rest of the house!


New wood before being creosoted. The reverse side was sealed with silicone and walls will be insulated before being finished with plasterboard on the reverse side.


Some of the wattle & daub wall's coating is cracked, so we removed weak parts - to be repaired and repainted (White) later.

All the exterior wood will also be darkened & preserved with odourless creosote, but bearing in mind the timeline this will only be completed after the interior's been finished to make the house habitable by our family!